Saturday, January 17, 2015

Quit your wining...

My husband and I have been known to raise a glass now and then.  And if you are going to raise a glass, you will need a place to store your supply of wine. So I started hunting on Craigslist for a wine rack to stash below a side table, one that would hold more than the 6 bottles allowed in a lot of the ones I was finding. Right away I was lucky enough to find a pine and galvanized steel rack on CL that would hold 24 bottles for only $10.


It was simple, clean  and sturdy without "scroll-y" grapevines or any other goofy looking wine motifs. AND it fit under the table with about 1" to spare. Close!

Here's the same rack (but for 28 bottles) that's sold at World Market for $99.

I may stain the wood black at some point to make it blend in better with the table, but for now it works just fine.


What I learned from this project:
1. Measure! Like I said, I had about 1" to spare.
2. Some wine racks won't allow wider champagne bottles, but luckily this one did.
3. I need to buy more wine to fill it up.


Sunday, October 5, 2014

Freebie workhorse chairs...


Sometimes a freebie proves itself valuable over and over.
I rescued these 2 chairs that had been discarded in the alley behind my former house years ago, and this is third time I've repainted and recovered them. They've been used in my living room, guest room, office, and now in my craft room. I had recently recovered my bedroom headboard with grey felt and removed the existing green print fabric that was still in perfect condition. I unscrewed the seat cushions and stapled the repurposed headboard fabric over them. Then, it was just a matter of repainting the chair frames white to give them both a fresh look.


What I learned from this project:

1. Not too much since this was the third time I've redone these chairs.

2. But I still had enough fabric left over to make a yoga mat carrier. (Learned how from a tutorial on YouTube)

3. I hate yoga.


Not your parents' card table...

Remember sneaking out of bed when you were a kid and peeking around the corner when your parents had some friends over to play bridge? Two couples seated around the ubiquitous card table, sipping "highballs"...me neither. My parents didn't play bridge...ok, well I remember the "highball" part. Anyway, everyone had a card table that got dragged out for those poker nights or for the ever dreaded "kid's table" at Thanksgiving. And it may have been a temporary stand in for a dining table in your first apartment.
 
The point is, they are useful...but they are also  ugly. And the more use they get, the uglier they get.
Here was my parents' card table after many years of abuse until its final banishment to the garage where all manner of further abuse made it all the more unsightly. 

But that was about to change.


I wanted something fun and colorful that could stand on its own without needing to be covered with a tablecloth. My supplies were a fruity patterned oilcloth purchased online and some orange spray paint. I unscrewed the table top from its metal base and just wrapped the oilcloth around the top, then stapled it to the underside. Then I spray painted the frame orange and screwed the top back on after it was dry.
Done.
Now, where's my highball???


What I learned from this project:

1. Be careful to make sure the staples aren't so long that they poke through the tabletop. The first staples I tried were a little too long and so I had to switch to shorter staples.  

2. After initially thinking I would use vinyl, I decided on oilcloth since it's more pliable and durable, especially if you are using the table outside.

3. I don't like highballs.


Thursday, August 7, 2014

Drama Queen...

It's summer and it's been a good 3 months where the house has been relatively calm and chaos free. Well, we can't have that, can we?
Time for more remodeling...
total tile cost for this bath: $5.50 !!
gutted powder room
Next up on our project list was to redo our first floor powder room and to finally rip out the carpeting (ewww!) from this and 2 other bathrooms and replace it all with tile. We had enough gray porcelain tile (just barely) left over from the basement bath remodel to complete the floor in the powder room. All the tile cost us a whopping $11 on Craigslist. Not bad for 2 bathrooms. Looks great (see above).


The powder room needed to be completely gutted, so I searched CL for a replacement vanity. Sadly, nothing inspired me.


The floor tile was our only CL score, but we did repurpose a couple of items we already owned. An inexpensive Target framed full length mirror ($14) now serves as our tall vanity mirror. Using that simple item saved us hundreds of dollars that we otherwise would have spent for a custom framed mirror.  LED lights from Home Depot hide behind it and make the whole mirror GLOW when the wall switch is flipped on. We splurged on the tile behind the mirror, but since it was for a small area, we didn't need very much.


We finished off the bathroom with some framed artwork we picked up at a local art fair and some framed Chicago postcards.


And the shutter leaning against a wall is part of a closet door salvaged from our basement remodel. I spray painted it a grape purple and display folded cards over it.

A little drama in a little room.

What I learned from this project:
1. Small room does not equal short time. This project took FOREVER, because we ordered some key items (waiting, waiting...)

2. And many steps were dependent on a certain thing being completed/installed before we could order the next material.

3. So we threw a party when it was finally done...a small party...only as many people who could cram into the powder room at one time were invited...that would be 4.


Sunday, August 11, 2013

Bedroom refresh...


It's been a few years since I first brought home a pair of CL dressers for our master bedroom. I painted the honey oak dressers and updated their 80's look then with new paint and added hardware, but now it was time to refresh them once again.

The dressers were great: so functional and  they fit the space perfectly, so they really just needed a  little tweaking. We recently repainted our bedroom walls in a light warm gray, and so I repainted the dressers a darker gray and repainted the ceramic lamps (which I had never done before, yikes!) a bright sunflower yellow to go with our new black, white and yellow bedding.
Repainting the dressers: piece o' cake. I just mixed up the shade of gray that I wanted from some black and white paint I already had. And I let the dressers dry for a week before I set anything back on top of them.
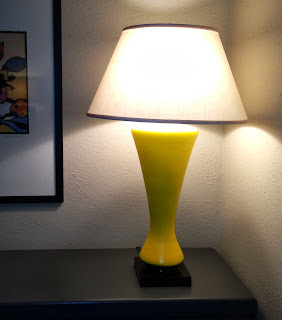
The lamps...that's another story. I did plenty of research on websites and blogs about painting ceramic lamps and settled on spray painting them with Krylon Fusion, "the only spray paint out there that adheres to slick surfaces problem-free", according to a magazine that rhymes with "Real Pimple". I ended up needing 3 cans of this paint just to cover up the light green paint underneath to get the yellow color I desired. In retrospect, I should have sprayed them first with a primer (even though the can said I wouldn't need to). I wanted a super glossy finish too, but even with glossy spray paint and a top coat of glossy acrylic clearcoat, I didn't get the super shiny finish I wanted. Ok, so they still came out ok (no drips!)
What I learned from this project:
1. No matter what the can says: USE PRIMER FIRST!!
2. Spray paint goes everywhere, so protect every surface unless you want your car in the garage (which you were too lazy to move) to have a light dusting of sunflower yellow!
3. Buy more cans of spray paint than you think you will need. You can always return any extra later. Nothing annoys me more than having to go back to the store in the middle of the project.
4. Nothing except for having a sunflower yellow car.

Dropleaf table...


For my new craft room I needed a work table, but preferably one that wouldn't fill up the whole room in case I needed some floor space (you know, to practice my Dancin' with Stars routine). I was lucky enough to have a small, but functional gateleg table that belonged to my mom. It was my grandmother's kitchen table first, then was passed down to my mom where she used it as a spare table in her family room. She had repainted it years ago during the "great antiquing craze",  and now I would repaint it again. Here's a "before" shot while I was already in the midst of another craft project.  
                              
And here's my newly painted high gloss orange table with gray trim.


What I learned from this project:
1. I'm not really into antiques, but it's fun having a piece of furniture that has some family history.
2. Paint color unites items no matter what the style.
3. What this table lacks in size is offset by its portability - it's easy to move aside when I need some floor space (you know, for that killer Paso Doble).


Tuesday, June 18, 2013

A room of one's own...

     I had craft and art supplies scattered in various places, and since moving into this house I haven't had a decent place to work on projects where they wouldn't take over the kitchen counter or the bed in our guestroom. So when we remodeled our basement I lobbied for a dedicated workroom. It could be converted to another bedroom if needed, but for now...it would be all mine!
     I was determined to just repurpose furnishings that I already had, no need to buy much that was new. But I did want this space to look cohesive and colorful, so I fully expected to do some repainting. (yay!!) 
    Here's a picture of the room with all my furnishings waiting to be transformed.


Painting opportunities - a work in progress!


 My dresser from childhood (which has lived through flower power decals, black lacquer, and terra cotta finishes) got a wakeup call with apple green high gloss paint and gray ceramic knobs scored at a huge discount from my favorite bargain haunt, Ross. Now it houses art supplies, stencils, craft paint, etc.


I repainted two of my alley-find chairs white and scooted one under the table that I revamped from a $15 CL purchase from several years ago (from my old breakfast nook). This time I repurposed it as a sewing table painted traffic cone orange.
Above the table I covered a foamcore board with old maps and hung clipboards I painted with magnetic paint. The boxes below are also covered with maps (empty copy paper boxes where I now store fabric scraps).
The other chair went under my repainted garage sale file cabinets topped with a piece of a cast off door from someone else's remodeling project.
The shelves above it are inexpensive IKEA shelves (one of my few new purchases in this room).


An old gateleg table that was my mom's (now painted the same traffic cone orange) functions as my main worktable in the center of the room.


 Rounding out the furniture is the armoire that was one of my very first CL purchases. Check out my post A bedroom with no closet to see its first incarnation. Now I'm using it as a wrapping paper/spray paint supply closet.


What I learned from this project:

1. IKEA has some great fabric by the yard at bargain prices - I made the curtains for this room and the fabric was only $7.99 yd.
2. The large grommet kits for the curtains (purchased at Michaels) were super easy to use.
3. Primer is your friend. Use it.
4. 1 qt. apple green paint + 1 qt. orange paint = a roomful of happy